As someone who cherishes a dazzling smile accessorized with glittering tooth gems, I understand the allure of this dental décor. However, there inevitably comes a time when the twinkle needs to retire, and removing tooth gems without damage becomes paramount. Having had my fair share of experiences with these sparkly additions, I’ve discovered that safe tooth gem removal at home is possible, albeit with caution and the right know-how.
Whether it’s a DIY tooth gem removal attempt or a decision to consult a professional, it is critical for the process to be painless and to protect the precious enamel underneath. To maintain the integrity of your oral care, the tooth gem removal process should be carried out painstakingly, using appropriate methods and tools that safeguard against any potential damage. I’m here to guide you through this process, ensuring your smile remains unharmed.
Key Takeaways
- Removing tooth gems at home requires careful planning and gentle techniques.
- DIY tooth gem removal can be done safely using dental floss or over-the-counter products.
- For a pain-free experience, avoid forceful actions that can damage tooth enamel.
- Professional assistance is recommended for removing tooth gems that feel firmly attached.
- After removal, it is crucial to follow appropriate dental hygiene to prevent any complications.
- The tooth gem removal process, when done correctly, neither harms the tooth nor causes discomfort.
Understanding Tooth Gems
My fascination with the sparkle of tooth gems began when I first saw their glimmer on someone’s smile. As I delved into the world of tooth gem application, I became familiar with the nuances of this trend. It’s not just about the shine; it’s about understanding the semi-permanent nature of these trinkets that safely attach to one’s enamel. Safe enough for everyday wear, the adhesive process is remarkably quick—taking only about 10 to 15 minutes and requiring no drilling, similar to the ease of attaching traditional orthodontic braces.
True to their semi-permanent label, the longevity of tooth gems is not etched in stone. They can dazzle on your teeth from anywhere between a month and an entire year. Much like any piece of jewelry, their durability depends on individual care factors such as oral hygiene and the natural acidity of your saliva. Though deemed safe, these tiny treasures bring with them their own set of challenges; they could complicate your dental hygiene routine and thus, necessitate closer inspection during your bi-annual dental cleanings.
There are also the risks of tooth gems that any potential wearer should be conscious of—risks that go beyond the initial enchantment of these shiny adornments. Addressing the glittery elephant in the room, tooth gems do carry the potential to cause issues if not monitored or applied correctly. From complications in daily cleaning routines to unexpected detachment, these factors frame the narrative around the dental procedures for tooth gem removal when the time inevitably comes to bid them goodbye.
| Application Duration | Longevity Factors | Professional Observation |
|---|---|---|
| 10-15 minutes | Saliva acidity, Oral hygiene, Daily habits | Regular dental check-ups to monitor gem and enamel |
| No drilling, Similar to braces application | Diet, Gem placement, Gem size | Assessment during professional cleanings |
Thus, the sparkling world of tooth gems isn’t just about adding a touch of pizzazz to your grin; it’s also steeped in the necessity for careful consideration, from application to removal. It’s essential to tread lightly through this bejeweled journey, honoring our teeth’s integrity every step of the way.
When to Consider Tooth Gem Removal
As I reflect on my experiences with the sparkly adornments on my pearly whites, I’ve realized that while tooth gems can be harmless fun, there’s a responsible moment to consider their removal. Tooth gem removal indications often stem from signs of potential dental health issues, primarily to ensure tooth enamel safety. Understanding when to say goodbye to these glittery companions will prevent unwelcome dental surprises and keep your smile in optimal health.
Signs of Weakened Enamel
It’s important to monitor the condition of your teeth while sporting these shiny accessories. If you notice any dullness or increased sensitivity around the gem’s location, it might suggest that the enamel is compromised. This is one of the explicit tooth gem removal indications—prompting a necessary removal to protect your enamel’s integrity.
Risks of Prolonged Wear
Though a tooth gem’s presence is often harmless, elongated wear beyond the recommended tooth gem lifespan can pose risks. The enamel underneath can weaken, or at worse, the gem can dislodge unexpectedly—potentially leading to inhalation or swallowing. Teeth gem removal at home should be performed or at least decided upon when these risks surface.
The Lifespan of Tooth Gems
Tooth gems have a varied lifespan, lasting anywhere from several weeks to a full year, and the longevity largely leans on individual care and habits. Yet, regardless of the tooth gem lifespan, it is advisable to proactively remove the gem to prevent any potential harm. Preemptive action is a hallmark of tooth enamel safety and alludes to a more thoughtful approach to oral adornments.
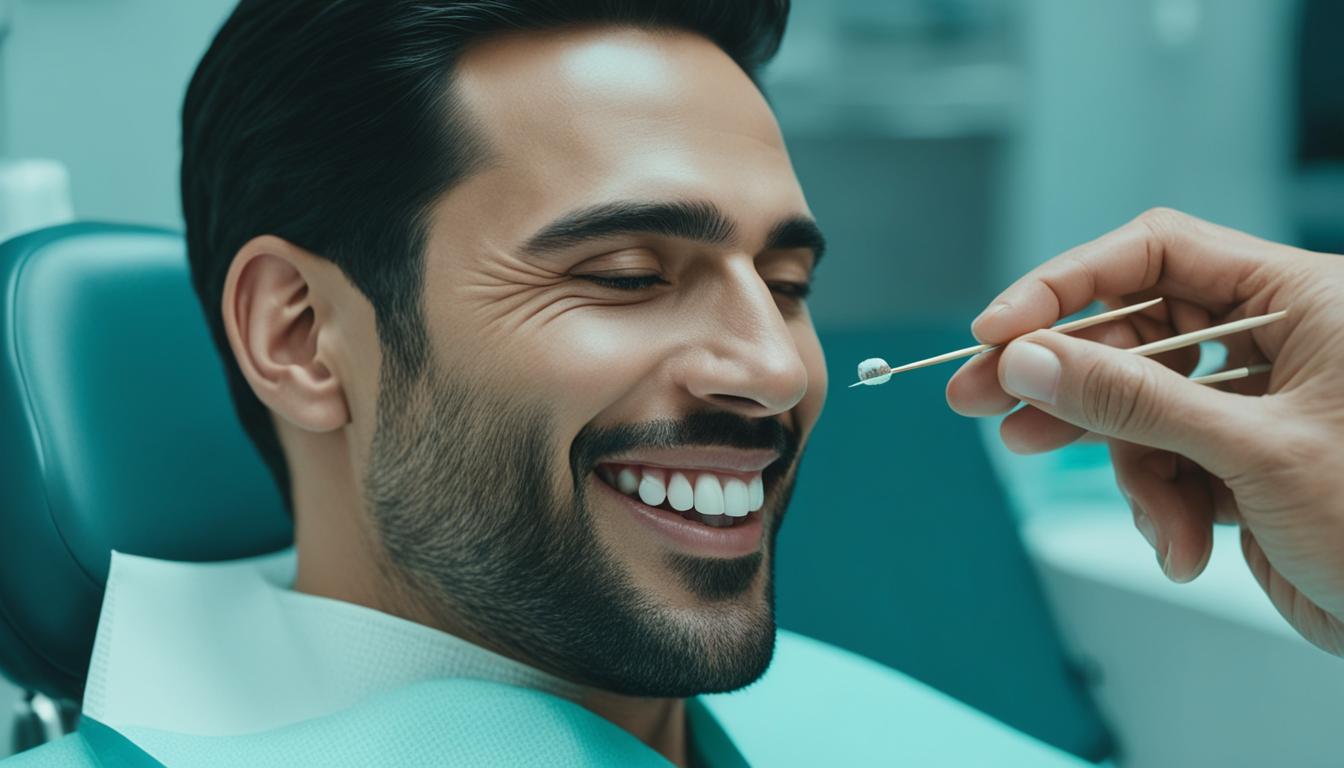
The Importance of Professional Tooth Gem Removal
My personal journey with tooth gems has taught me the value of relying on dental professional guidance when it’s time to part with these glittering accessories. Beyond aesthetics, the real charm lies in safe tooth gem removal, which is why turning to a specialist is crucial. They bring expertise in tooth gem removal, which not only spares one from potential dental mishaps but also instills a sense of ease knowing that the procedure is in capable hands.
Why Choose a Dental Professional?
Resorting to a dental professional for tooth gem removal isn’t just the conventional choice—it’s the smart one. The reason is evident: a dental professional’s expertise ensures that the removal is performed with precision. Their skilled eyes and steady hands, equipped with the right tools, make all the difference, reducing the risk of enamel damage and soft tissue inflammation. They have the know-how to deal with challenges that might arise during the procedure, assuring a serene and efficient experience.
Benefits of Professional Removal
Professional tooth gem removal offers an array of benefits that DIY methods can’t match. The most compelling advantage is safety. A dentist, armed with specialized instruments such as a dental scaler and a handpiece with a bur, meticulously removes the gem and any remaining adhesive, thereby preserving the integrity of the tooth’s surface. The proficiency and speed with which this is done cannot be understated; what might take you an hour at home, fraught with uncertainty, takes them minutes in the dental chair.

Moreover, the potential for complications post-removal is greatly diminished under professional care. Given the delicate nature of tooth gem removal, unintentional outcomes such as dental damage and irregularities on the tooth surface are best avoided through professional intervention. This reassurance is invaluable, especially for those seeking a painless and swift resolution.
Finally, the after-care support offered post-removal by dental professionals completes the superior service they provide. Their insightful advice, tailored to each individual, ensures not only a successful removal but also a smooth transition back to gem-free dental health.
In conclusion, while tooth gems add a seductive sparkle to our smiles, the role of a trained dental professional in their removal stands unparalleled in both efficacy and safety. Their specialized skills not only guarantee a seamless process but also grant us peace of mind—a priceless commodity. So, when the gleam fades, trust that your dental wellbeing will remain luminous under the watchful eyes of a qualified dental practitioner.
How to Remove Tooth Gem at Home
When it comes to **DIY tooth gem removal**, I’ve learned that patience and careful technique are essential. It’s enticing to think that teeth gem removal at home can be done swiftly with tools from a **home tooth gem kit**, yet one must approach this task with the precision of a sculptor. The success of the DIY removal often lies in the preparatory steps, which include the following:
- Gently brushing teeth to ensure a clean surface.
- Drying the tooth meticulously to allow for better grip.
- Using a small cotton swab for the application of **dental-grade adhesive** when necessary.
It’s crucial to work in a well-lit area, making sure every motion is calculated and steady to avoid causing any trauma to the gums or inadvertently swallowing the gem. If during the process, the gem feels as though it’s steadfastly anchored, I strongly recommend refraining from further attempts and seeking a professional. A dentist’s trained hand can ensure the gem is removed safely—**how to remove a tooth gem** should not lead to damaged teeth.
Many might be curious about when to attempt removal. If you’re using a **home tooth gem kit**, it will generally come with instructions specific to the brand. Here’s a general guide for when it’s time to part ways with your glittering accessory:
- Consider removal if the gem loosens to reduce the risk of swallowing.
- Remove the tooth gem if you notice any discoloration or decay around the tooth that supports the gem.
- Remove and reapply the gem if it begins to feel uncomfortable or if there’s a significant event in which the gem’s absence is preferred.
As someone who has faced the DIY challenge, let me underscore the importance of aftercare. Following removal, you should:
- Rinse your mouth thoroughly to clear any residuals.
- Monitor the site for any signs of distress or irritation.
- Resume normal dental hygiene, paying extra attention to the area where the gem was attached.
In conclusion, safely removing a tooth gem at home might feel like a task reserved for a calm hand and a discerning eye. While I’m all for the empowerment of skilful **DIY tooth gem removal**, there’s a fine line where professional expertise guarantees safety and peace of mind. So, if your home efforts feel shaky, don’t hesitate to book that dental appointment.
Required Tools for Safe Home Removal
Embarking on the careful process of removing a tooth gem at home, it’s essential to equip oneself with the correct tools to ensure a safe and sterile procedure. From my own experience, having the right equipment is as crucial as following the precise steps. Without them, one cannot guarantee the protection of our enamel or the maintenance of dental hygiene, two pillars of good oral health.
Appropriate Dental Kit
When I consider a home removal process, the first thing I look for is a comprehensive tooth gem removal kit. Such kits often include the tools condoned by dental professionals essential for the task at hand. These could range from UV lamps instrumental in ensuring the longevity of the adhesive to dental-grade applicator wands designed for precision handling. Safety and efficacy are key, so sourcing a kit developed under professional guidance is crucial.
Using Dental Floss
Another tool often overlooked but indispensible is dental floss. I’ve found that using dental floss for tooth gem removal can be a gentle and effective method. The technique involves easing the floss underneath the edges of the gem and applying a slow, see-sawing motion. It’s a delicate balance between applying sufficient force to lift the gem and maintaining a gentle touch to avoid damaging the tooth surface beneath.
Cleaning and Sterilization
Ensuring a clean environment is not a step to be taken lightly. Sterilization and cleanliness remain paramount throughout the removal process. This not only involves sterilization in tooth gem removal but also encompasses a broader spectrum of dental hygiene practices. Whether it’s sterilizing the removal tools or thoroughly washing hands before the procedure, these actions minimize risk and protect oral health.
| Tools | Purpose | Importance |
|---|---|---|
| UV Lamp | Set and verify the secure bonding of the adhesive | Ensures the longevity of the gem’s adhesion |
| Dental-Grade Applicator Wand | Precise placement and removal of the tooth gem | Aids in a controlled process, preventing enamel damage |
| Dental Floss | Gentle removal of tooth gems | Provides a noninvasive removal method |
| Sanitization Products | Clean and sterilize removal tools | Prevents infection and maintains hygiene |
Maintaining the integrity of one’s smile hinges not only on the allure of decorative tooth gems but also on the ability to remove them safely and cleanly. With the appropriate tools and meticulous care, one can undertake this removal process confidently, ensuring that dental aesthetics do not compromise oral health.

Detailed Step-by-Step Tooth Gem Removal
As an avid supporter of sprucing up smiles with tooth gems, I feel a sense of duty to impart my insights on the tooth gem removal steps; an undertaking that requires equal measures of finesse and patience. If the jeweled sparkle of your tooth gem has dimmed or you’re simply ready for a change, the tooth gem removal process at home can be straightforward and painless when done correctly. Here’s a comprehensive guide on how to achieve safe tooth gem removal from the confines of your abode.
- Initial Cleansing: Begin by thoroughly brushing your teeth to ensure all plaque, food particles, and residue are removed. Follow this up with a hearty rinse.
- Prepping the Gem Site: Dry the tooth meticulously with cotton. A dry surface is paramount as it precludes the gem from sliding during the removal procedure.
- Apply the Removal Agent: If the tooth gem feels loose, gently slip dental floss under the gem’s edge. Use a cautious back-and-forth motion aiming to lift the gem from the top edge downward.
- Seek Professional Help if Necessary: If you encounter resistance, or the gem remains anchored, stop. It’s imperative at this stage to schedule a visit with your dentist to prevent any inadvertent damage.
Each step through this narrative must be orchestrated with the understated elegance of a painless tooth gem removal symphony, ensuring neither the gem nor the enamel beneath is unduly distressed during the process. Remember, a hasty or incorrect removal approach could lead to enamel damage, which is a fate best avoided. Ensuring the journey from a gem-studded to a gem-free smile is void of pain and complications is an endeavor worth undertaking with care and informed precision.

In the event the tooth gem does bid adieu smoothly, congratulations are in order. But it doesn’t end there. Reflect upon the void where once the gem lay, and transition with grace into post-removal care, nurturing and guarding the territory with an enhanced dental hygiene routine. This small passage in your oral history—a minute, but sparkling chapter—whispers the lesson of impermanence and the beauty of preservation.
Post-Removal Care and Monitoring
After the glistening tooth gem has been removed, it’s critical to switch the focus to post-removal care, ensuring the tooth beneath where the gem once lay is undisturbed and in peak condition. Tooth gem aftercare is not merely a suggestion—it’s an essential part of preserving dental health and preventing potential issues.

Immediate Aftercare Steps
Immediately following the removal of your tooth gem, embrace a regimen of diligent oral hygiene to circumvent any complications. To start, avoid brushing the specific area where the gem was placed for the first 24 hours, keeping that spot untouched by bristles to allow the enamel surface to stabilize. For those who favor the buzz of an electric toothbrush, press pause on its use for 48 hours post-removal to avert any undue abrasion.
| Aftercare Activity | Timeframe | Reason |
|---|---|---|
| Avoid brushing over the area | 24 hours | To let the enamel rest and reseal |
| Avoid electric toothbrush | 48 hours | Prevents irritation and gives enamel time to recover |
| Meticulous oral hygiene | Ongoing | Ensures overall dental health and guards against plaque accumulation |
Monitoring for Potential Issues
After navigating the immediate aftercare guidance, it becomes paramount to keep a watchful eye on the dental territory from which your gleaming companion was lifted. The subsequent days should include a vigilant inspection for indications of inflammation, sensitivity, or signs that whisper of infection. This observance extends to monitoring your overall dental health, as it’s essential to catch—and promptly address—any early signs of distress. By adhering to these practices, you ensure that the charm of your tooth gem remains even after its tenure on your tooth concludes.
- Examine the former gem site daily for any abnormalities.
- Resume normal brushing with a gentle, non-abrasive toothpaste and soft-bristled brush following the initial 24-hour period.
- Keep up with regular flossing, avoiding any forceful movements near the gem’s prior roost.
Through attentive aftercare and proactive monitoring of oral health, one can ensure that the legacy of their tooth gem is painless beauty, not a blemittished grin. I’ve found, through my own experiences, that the precious enamel that gifts us our smiles deserves such dedicated guardianship, and honestly, it’s a small price for the previous glitz it supported.
Consulting Your Dentist After Removal
My experience with wearing and removing tooth gems has led me to a valuable realization: scheduling a dental consultation following the removal can be an essential step to safeguarding dental health. Whether you’ve managed the removal smoothly at home or encountered some resistance, a professional dental check-up can ensure everything is as it should be.
When to Visit the Dentist
After attempting the tooth gem removal, if something doesn’t feel quite right—maybe there’s a rough patch where the gem was, or my tooth reacts sensitively to temperature changes—it’s my cue to visit the dentist. Particularly if the gem was tenaciously attached or there are any signs of damage or discomfort, I always recommend visiting dentist after tooth gem removal. It’s far better to err on the side of caution and have a professional make sure all adhesive has been removed, and the tooth surface is intact.
What to Expect During the Visit
Walking into my dentist’s office, I expect a thorough dental evaluation after gem removal. The dentist will typically conduct an all-inclusive assessment to check for any signs of enamel wear or structural damage. They might use specialized tools to magnify and illuminate the tooth from different angles, ensuring a comprehensive review. Moreover, if there are any concerns, they can recommend treatments or additional precautions to maintain my oral health. This reassurance, that my smile remains healthy and beautiful, is invaluable assurance for me.
| Aspect of Dental Visit | Description |
|---|---|
| Examination | Thorough inspection of the tooth surface and enamel |
| Cleaning | Professional cleaning to remove any residual adhesive |
| Assessment | Evaluate overall dental health and discuss any necessary follow-up care |
| Prevention | Advice on preventing future damage and maintaining oral hygiene post-gem removal |
My dental visits after such cosmetic alterations emphasize the importance of professional care and the peace of mind that comes with it. An involved dental professional is an ally in my pursuit of both an alluring and a healthy smile.
Risks of DIY Tooth Gem Removal
As someone who has dabbled in the realm of tooth gems, I feel compelled to share the potential hazards that come with the territory of DIY tooth gem removal. Venturing into this process without a meticulous understanding and a delicate touch can lead to more than just the jewel’s departure—it can mean bidding an unintended farewell to healthy tooth enamel.
Potential Damage to Tooth Enamel
It’s essential to acknowledge that removing tooth gems at home isn’t devoid of risks. I’ve learned that using unsuitable tools or employing robust force can distress the enamel, leading to potential chipping or cracking. Enamel, once impaired, may not only impact the brilliance of one’s smile but can host a plethora of dental health risks, including sensitivity and decay. The very thought of such damage is enough to coerce one to tread lightly or reconsider the DIY path altogether. And it’s not solely the enamel at stake—adjacent soft tissues lurk in the harm’s path too, should the procedure deviate from gentleness.
Preventing Damage and Infection
When I consider the goal of keeping one’s smile both vibrant and intact, the prevention of oral infection takes precedence in the process of tooth gem removal. Ensuring the use of approved kits, aligning with guided protocols, and sterilizing tools become not just steps, but tenets for maintaining the sanctity of dental health. Opting for professional removal over DIY strategies often surfaces as the prudent choice, particularly for those who are wary of the risks, valuing a meticulous and safeguarded approach.
Moreover, sustaining pristine dental hygiene forms the cornerstone of prevention. Regular dental visits for comprehensive cleanings and check-ups can be instrumental in promptly addressing any issues that may spring to life following a tooth gem removal—DIY or otherwise. The potential enamel damage one may fear is best countered by the carefulness of approach and the vigilance of aftercare.
When I muse over the allure of bedazzling one’s smile with tooth gems, the importance of knowledge and caution cannot be overemphasized. So, while the trend of tooth gems sparkles with fun and personality, one must not overlook the responsibility that comes with their removal—eschewing the risks for the continued treasure of unblemished dental health.
DIY Removal Versus Professional Services
When I considered removing my tooth gem, grappling with the decision between DIY and seeking professional services was no small feat. Comparing tooth gem removal options brought me clarity on the risks and benefits associated with each method, guiding my choice carefully.
While DIY kits offer convenience, they may lack the precise tools and expertise of a dental professional who is skilled in leaving the tooth undamaged and healthy. Some may choose DIY versus professional removal for reasons like cost-efficiency or the comfort of doing it at leisure, but one cannot deny the benefits of professional tooth gem removal.
In assessing my options, I acknowledged the swift and assured removal process that only a dental professional can provide. Therefore, these factors became a cornerstone in comparing tooth gem removal options:
| DIY Removal | Professional Removal |
|---|---|
| Performed at one’s own pace | Quick and efficient procedure |
| Greater risk for improper removal and tooth damage | Lower risk of tooth damage and thorough removal |
| May require over-the-counter products with varying effectiveness | Uses specialized tools for a clean and complete removal |
| No professional aftercare advice | Post-procedure care and guidance provided |
Ultimately, I resolved that the nuanced care and dental professional services linked with professional tooth gem removal were indeed irreplaceable. The inherent risks of a self-removal, added to the allure of a prompt, professional process, solidified the value of expertise in such a delicate matter for me.
In hindsight, I find myself content with the resolve to prioritize my dental health above all. My decision echoes the sentiment that while DIY has its place, the integrity of one’s dental health is best preserved under the stewardship of a skilled professional. The peace of mind that came with professional assistance was, to me, an unparalleled attribute of the service.
Conclusion
In my journey of dazzling smiles with tooth gems, I’ve come to appreciate the intricate process of adorning my teeth with these stylish jewels, as well as the significance of their removal. A comprehensive tooth gem removal guide becomes indispensable when the time arises to part ways with the sparkle. While the appeal of a DIY removal might tempt those seeking convenience, the overarching truth remains that complete tooth gem removal is best achieved under the vigilant care of a professional.
Throughout my personal experiences and research, considering tooth gem pros and cons has shaped my understanding of both the short-lived glamour they offer and the dental implications that follow. For those deciding on professional tooth gem removal, rest assured that seeking expert advice is a wise endeavor that prioritizes the wellbeing of your dental health. Embracing professional services not only spares one the guesswork but assures a meticulous and harm-free procedure, ensuring the tooth’s integrity remains unsullied.
As the luster of my tooth gem dims, reflecting on the removal method becomes paramount to preserving my smile’s essence. Whether through careful at-home practices or the competent hands of a dentist, the goal remains the same: a safe and clean removal that protects my teeth. Through prudent decisions and diligent care, my journey with tooth gems—whether embracing their twinkling presence or bidding them farewell—remains a delightful narrative in my dental saga.
FAQ
Can tooth gems be safely removed at home?
Yes, tooth gems can be removed at home, provided you use gentle techniques and follow the correct procedures. If the gem does not come off easily, it’s best to consult a professional to avoid damaging your teeth.
What is the process for DIY tooth gem removal?
The DIY tooth gem removal process generally involves cleaning and drying the tooth, using dental floss to gently ease off the gem from the edge, and avoiding the use of excessive force to prevent damage.
How long do tooth gems usually last?
Tooth gems can last anywhere from several weeks up to a year, but their longevity depends on various factors like oral hygiene and saliva acidity.
What are the signs that it’s time to remove my tooth gem?
You should consider removing your tooth gem if you notice signs of weakened enamel, irritation around the tooth, or difficulty maintaining dental hygiene in the area.
Why should I opt for professional tooth gem removal?
Professional tooth gem removal guarantees the safe and painless detachment of the gem, without risking damage to your tooth enamel or surrounding soft tissue, thanks to specialized tools and techniques.
What tools are needed for safe home tooth gem removal?
The proper tools include dental floss, sterile gauze or cotton swabs, and an over-the-counter dental adhesive remover, if available. It’s important that these tools are used with care.
What are the immediate aftercare steps following tooth gem removal?
After tooth gem removal, practice good dental hygiene, avoid brushing the area harshly for 24 hours, and monitor the spot for any signs of damage or sensitivity.
When should I visit the dentist after attempting home tooth gem removal?
It’s wise to visit the dentist after a home removal if you have any concerns about tooth damage or if the tooth gem was particularly difficult to remove.
What can happen if I incorrectly remove a tooth gem at home?
Incorrect DIY removal can lead to tooth enamel damage, soft tissue injury, or even infection, emphasizing the importance of using the right tools and techniques or seeking professional help.
How do the risks and benefits of DIY tooth gem removal compare to professional services?
While DIY removal may offer convenience, it comes with risks such as potential for damage or improper removal. Professional services provide expertise and minimize the risk of damage, supporting overall dental health.